Homebrewを使ったMacへのPython3のインストール方法
Python3をインストールし環境構築をする2
Python3をMacにインストール方法2
を始めようと思い自分用の忘備録として各OS毎のインストール方法を残しておきます。
自分用なので読みずらい部分もありますが参考になればと思い公開します。
前回はインストーラーを使ったインストール方法でしたが、
Macではもう一つインストール方法がある事を忘れていました。
今回はもう一つの方法と手順を残しておきます。
その方法は【Homebrew】を使った方法です。
Homebrewとは何なのか簡単に説明を残します。
Linuxで使う「apt」・「RPM」・「yum」の様な「」で、
macOS用パッケージ管理システムの一つと発音するらしい。
Homebrewを使うとターミナルからオープンソースで公開されているパッケージ(ソフトウェア)の導入を「brew」コマンドで一元管理することで単純化できる様になります。
例えば、環境構築ではよくありますが依存関係のあるソフトウェアを複数インストールしないといけなくなったりしますが、
Homebrewを使えばのその様なソフトのインストールもbrewコマンドでできるので環境構築が楽になります。
準備に「Homebrew」のインストールが必要になりますが、準備後は楽になるのでHomebrewの手順も残しておきます。
後々のアップデートやアンインストールする時の楽になるのでHomebrewでの管理方法も記事に残します。
にドキュメントがあるので詳しく知りたい方は参考にしてください。
わき道に逸れましたが早速インストール方法を残します。
Homebrewを使ったPython3のインストール方法
0.Homebrewの確認
Homebrewがインストールされていないか確認します。
ターミナルで「brew -v」を実行して以下の結果が表示された時は、
インストール済みなのでHomebrewのインストールはしないでください。
$brew -v
Homebrew 2.0.0
Homebrew/homebrew-core (git revision cb29; last commit 2019-02-07)
1.Homebrewのインストール
Homebrewのにインストール用のコマンドが記載してあるので、コピーしてターミナルで実行してください。
2019/2/7時点では以下の様なコマンドでした。
変更されることがあるので公式サイトからコマンドはコピーしてターミナルで実行して下さい。

/usr/bin/ruby -e "$(curl -fsSL https://raw.githubusercontent.com/Homebrew/install/master/install)"ターミナルで実行すると「Press RETURN to continue or any other key to abort」と要求されるので、「renturn」キーを押します。
次に、管理権限(sudoコマンド)のパスワードが要求されるので、
ログインしているユーザー、もしくは管理者ユーザーのパスワードを入力して下さい。
「==> /usr/bin/sudo /bin/chmod u+rwx /usr/local/bin
Password:」<<<ここに入力
$ /usr/bin/ruby -e "$(curl -fsSL https://raw.githubusercontent.com/Homebrew/install/master/install)"
==> This script will install:
/usr/local/bin/brew
/usr/local/share/doc/homebrew
/usr/local/share/man/man1/brew.1
/usr/local/share/zsh/site-functions/_brew
/usr/local/etc/bash_completion.d/brew
/usr/local/Homebrew
==> The following existing directories will be made group writable:
/usr/local/bin
==> The following existing directories will have their owner set to yuki_air:
/usr/local/bin
==> The following existing directories will have their group set to admin:
/usr/local/bin
==> The following new directories will be created:
/usr/local/etc
/usr/local/include
/usr/local/lib
/usr/local/sbin
/usr/local/share
/usr/local/var
/usr/local/opt
/usr/local/share/zsh
/usr/local/share/zsh/site-functions
/usr/local/var/homebrew
/usr/local/var/homebrew/linked
/usr/local/Cellar
/usr/local/Caskroom
/usr/local/Homebrew
/usr/local/Frameworks
==> The Xcode Command Line Tools will be installed.
Press RETURN to continue or any other key to abort
管理者パスワード入力しreturnキーを押すとインストールを開始します。
完了するまで待って下さい。
==> /usr/bin/sudo /bin/chmod u+rwx /usr/local/bin
Password:
==> /usr/bin/sudo /bin/chmod g+rwx /usr/local/bin
==> /usr/bin/sudo /usr/sbin/chown yuki_air /usr/local/bin
==> /usr/bin/sudo /usr/bin/chgrp admin /usr/local/bin
==> /usr/bin/sudo /bin/mkdir -p /usr/local/etc /usr/local/include /usr/local/lib /usr/local/sbin /usr/local/share /usr/local/var /usr/local/opt /usr/local/share/zsh /usr/local/share/zsh/site-functions /usr/local/var/homebrew /usr/local/var/homebrew/linked /usr/local/Cellar /usr/local/Caskroom /usr/local/Homebrew /usr/local/Frameworks
==> /usr/bin/sudo /bin/chmod g+rwx /usr/local/etc /usr/local/include /usr/local/lib /usr/local/sbin /usr/local/share /usr/local/var /usr/local/opt /usr/local/share/zsh /usr/local/share/zsh/site-functions /usr/local/var/homebrew /usr/local/var/homebrew/linked /usr/local/Cellar /usr/local/Caskroom /usr/local/Homebrew /usr/local/Frameworks
==> /usr/bin/sudo /bin/chmod 755 /usr/local/share/zsh /usr/local/share/zsh/site-functions
==> /usr/bin/sudo /usr/sbin/chown yuki_air /usr/local/etc /usr/local/include /usr/local/lib /usr/local/sbin /usr/local/share /usr/local/var /usr/local/opt /usr/local/share/zsh /usr/local/share/zsh/site-functions /usr/local/var/homebrew /usr/local/var/homebrew/linked /usr/local/Cellar /usr/local/Caskroom /usr/local/Homebrew /usr/local/Frameworks
==> /usr/bin/sudo /usr/bin/chgrp admin /usr/local/etc /usr/local/include /usr/local/lib /usr/local/sbin /usr/local/share /usr/local/var /usr/local/opt /usr/local/share/zsh /usr/local/share/zsh/site-functions /usr/local/var/homebrew /usr/local/var/homebrew/linked /usr/local/Cellar /usr/local/Caskroom /usr/local/Homebrew /usr/local/Frameworks
==> /usr/bin/sudo /bin/mkdir -p /Users/yuki_air/Library/Caches/Homebrew
==> /usr/bin/sudo /bin/chmod g+rwx /Users/yuki_air/Library/Caches/Homebrew
==> /usr/bin/sudo /usr/sbin/chown yuki_air /Users/yuki_air/Library/Caches/Homebrew
==> Searching online for the Command Line Tools
==> /usr/bin/sudo /usr/bin/touch /tmp/.com.apple.dt.CommandLineTools.installondemand.in-progress
==> Installing Command Line Tools (macOS Mojave version 10.14) for Xcode-10.1
==> /usr/bin/sudo /usr/sbin/softwareupdate -i Command\ Line\ Tools\ (macOS\ Mojave\ version\ 10.14)\ for\ Xcode-10.1
Software Update Tool
Downloading Command Line Tools (macOS Mojave version 10.14) for Xcode
Downloaded Command Line Tools (macOS Mojave version 10.14) for Xcode
Installing Command Line Tools (macOS Mojave version 10.14) for Xcode
Done with Command Line Tools (macOS Mojave version 10.14) for Xcode
Done.
==> /usr/bin/sudo /bin/rm -f /tmp/.com.apple.dt.CommandLineTools.installondemand.in-progress
==> /usr/bin/sudo /usr/bin/xcode-select --switch /Library/Developer/CommandLineTools
==> Downloading and installing Homebrew...
remote: Enumerating objects: 25, done.
remote: Counting objects: 100% (25/25), done.
remote: Compressing objects: 100% (16/16), done.
remote: Total 118405 (delta 12), reused 21 (delta 9), pack-reused 118380
Receiving objects: 100% (118405/118405), 28.03 MiB | 6.04 MiB/s, done.
Resolving deltas: 100% (86507/86507), done.
From https://github.com/Homebrew/brew
* [new branch] master -> origin/master
* [new tag] 0.1 -> 0.1
* [new tag] 0.2 -> 0.2
* [new tag] 0.3 -> 0.3
* [new tag] 0.4 -> 0.4
* [new tag] 0.5 -> 0.5
* [new tag] 0.6 -> 0.6
* [new tag] 0.7 -> 0.7
* [new tag] 0.7.1 -> 0.7.1
* [new tag] 0.8 -> 0.8
* [new tag] 0.8.1 -> 0.8.1
* [new tag] 0.9 -> 0.9
* [new tag] 0.9.1 -> 0.9.1
* [new tag] 0.9.2 -> 0.9.2
* [new tag] 0.9.3 -> 0.9.3
* [new tag] 0.9.4 -> 0.9.4
* [new tag] 0.9.5 -> 0.9.5
* [new tag] 0.9.8 -> 0.9.8
* [new tag] 0.9.9 -> 0.9.9
* [new tag] 1.0.0 -> 1.0.0
* [new tag] 1.0.1 -> 1.0.1
* [new tag] 1.0.2 -> 1.0.2
* [new tag] 1.0.3 -> 1.0.3
* [new tag] 1.0.4 -> 1.0.4
* [new tag] 1.0.5 -> 1.0.5
* [new tag] 1.0.6 -> 1.0.6
* [new tag] 1.0.7 -> 1.0.7
* [new tag] 1.0.8 -> 1.0.8
* [new tag] 1.0.9 -> 1.0.9
* [new tag] 1.1.0 -> 1.1.0
* [new tag] 1.1.1 -> 1.1.1
* [new tag] 1.1.10 -> 1.1.10
* [new tag] 1.1.11 -> 1.1.11
* [new tag] 1.1.12 -> 1.1.12
* [new tag] 1.1.13 -> 1.1.13
* [new tag] 1.1.2 -> 1.1.2
* [new tag] 1.1.3 -> 1.1.3
* [new tag] 1.1.4 -> 1.1.4
* [new tag] 1.1.5 -> 1.1.5
* [new tag] 1.1.6 -> 1.1.6
* [new tag] 1.1.7 -> 1.1.7
* [new tag] 1.1.8 -> 1.1.8
* [new tag] 1.1.9 -> 1.1.9
* [new tag] 1.2.0 -> 1.2.0
* [new tag] 1.2.1 -> 1.2.1
* [new tag] 1.2.2 -> 1.2.2
* [new tag] 1.2.3 -> 1.2.3
* [new tag] 1.2.4 -> 1.2.4
* [new tag] 1.2.5 -> 1.2.5
* [new tag] 1.2.6 -> 1.2.6
* [new tag] 1.3.0 -> 1.3.0
* [new tag] 1.3.1 -> 1.3.1
* [new tag] 1.3.2 -> 1.3.2
* [new tag] 1.3.3 -> 1.3.3
* [new tag] 1.3.4 -> 1.3.4
* [new tag] 1.3.5 -> 1.3.5
* [new tag] 1.3.6 -> 1.3.6
* [new tag] 1.3.7 -> 1.3.7
* [new tag] 1.3.8 -> 1.3.8
* [new tag] 1.3.9 -> 1.3.9
* [new tag] 1.4.0 -> 1.4.0
* [new tag] 1.4.1 -> 1.4.1
* [new tag] 1.4.2 -> 1.4.2
* [new tag] 1.4.3 -> 1.4.3
* [new tag] 1.5.0 -> 1.5.0
* [new tag] 1.5.1 -> 1.5.1
* [new tag] 1.5.10 -> 1.5.10
* [new tag] 1.5.11 -> 1.5.11
* [new tag] 1.5.12 -> 1.5.12
* [new tag] 1.5.13 -> 1.5.13
* [new tag] 1.5.14 -> 1.5.14
* [new tag] 1.5.2 -> 1.5.2
* [new tag] 1.5.3 -> 1.5.3
* [new tag] 1.5.4 -> 1.5.4
* [new tag] 1.5.5 -> 1.5.5
* [new tag] 1.5.6 -> 1.5.6
* [new tag] 1.5.7 -> 1.5.7
* [new tag] 1.5.8 -> 1.5.8
* [new tag] 1.5.9 -> 1.5.9
* [new tag] 1.6.0 -> 1.6.0
* [new tag] 1.6.1 -> 1.6.1
* [new tag] 1.6.10 -> 1.6.10
* [new tag] 1.6.11 -> 1.6.11
* [new tag] 1.6.12 -> 1.6.12
* [new tag] 1.6.13 -> 1.6.13
* [new tag] 1.6.14 -> 1.6.14
* [new tag] 1.6.15 -> 1.6.15
* [new tag] 1.6.16 -> 1.6.16
* [new tag] 1.6.17 -> 1.6.17
* [new tag] 1.6.2 -> 1.6.2
* [new tag] 1.6.3 -> 1.6.3
* [new tag] 1.6.4 -> 1.6.4
* [new tag] 1.6.5 -> 1.6.5
* [new tag] 1.6.6 -> 1.6.6
* [new tag] 1.6.7 -> 1.6.7
* [new tag] 1.6.8 -> 1.6.8
* [new tag] 1.6.9 -> 1.6.9
* [new tag] 1.7.0 -> 1.7.0
* [new tag] 1.7.1 -> 1.7.1
* [new tag] 1.7.2 -> 1.7.2
* [new tag] 1.7.3 -> 1.7.3
* [new tag] 1.7.4 -> 1.7.4
* [new tag] 1.7.5 -> 1.7.5
* [new tag] 1.7.6 -> 1.7.6
* [new tag] 1.7.7 -> 1.7.7
* [new tag] 1.8.0 -> 1.8.0
* [new tag] 1.8.1 -> 1.8.1
* [new tag] 1.8.2 -> 1.8.2
* [new tag] 1.8.3 -> 1.8.3
* [new tag] 1.8.4 -> 1.8.4
* [new tag] 1.8.5 -> 1.8.5
* [new tag] 1.8.6 -> 1.8.6
* [new tag] 1.9.0 -> 1.9.0
* [new tag] 1.9.1 -> 1.9.1
* [new tag] 1.9.2 -> 1.9.2
* [new tag] 1.9.3 -> 1.9.3
* [new tag] 2.0.0 -> 2.0.0
HEAD is now at e32c15154 Merge pull request #5682 from gcbartlett/issues/5671
==> Homebrew is run entirely by unpaid volunteers. Please consider donating:
https://github.com/Homebrew/brew#donations
==> Tapping homebrew/core
Cloning into '/usr/local/Homebrew/Library/Taps/homebrew/homebrew-core'...
remote: Enumerating objects: 4914, done.
remote: Counting objects: 100% (4914/4914), done.
remote: Compressing objects: 100% (4713/4713), done.
remote: Total 4914 (delta 48), reused 330 (delta 9), pack-reused 0
Receiving objects: 100% (4914/4914), 3.96 MiB | 4.60 MiB/s, done.
Resolving deltas: 100% (48/48), done.
Checking out files: 100% (4931/4931), done.
Tapped 2 commands and 4699 formulae (4,956 files, 12.3MB).
Already up-to-date.
==> Installation successful!
==> Homebrew has enabled anonymous aggregate formulae and cask analytics.
Read the analytics documentation (and how to opt-out) here:
https://docs.brew.sh/Analytics
==> Homebrew is run entirely by unpaid volunteers. Please consider donating:
https://github.com/Homebrew/brew#donations
==> Next steps:
- Run `brew help` to get started
- Further documentation:
$
ターミナルに処理が戻ってくるとインストールの完了ですので「brew」コマンドが実行できるか確認します。
2.「brew doctor」コマンでHomebrewのインストール完了確認
ターミナルで「brew doctor」コマンドを実行し「Your system is ready to brew.」と結果が帰って来ればインストール完了しています。
これでHomebrewの準備が完了しました。
3.Homebrew(brewコマンド)によるPython3のインストール
ターミナルで「brew install python3」コマンドを実行しインストールします。
余談ですが、「brew install <式>」コマンドの「<式>」を変更して使えば、
他のソフトをインストールできます。
今回はPython3をインストールしたいので「<式>」に「python3」と指定して実行します。
実行が完了するまで待ちます。
$brew install python3
Updating Homebrew...
==> Installing dependencies for python: gdbm, openssl, readline, sqlite and xz
==> Installing python dependency: gdbm
######################################################################## 100.0%
==> Pouring gdbm-1.18.1.mojave.bottle.1.tar.gz
🍺 /usr/local/Cellar/gdbm/1.18.1: 20 files, 586.8KB
==> Installing python dependency: openssl
==> Downloading https://homebrew.bintray.com/bottles/openssl-1.0.2q.mojave.bottle.tar.gz
######################################################################## 100.0%
==> Pouring openssl-1.0.2q.mojave.bottle.tar.gz
==> Caveats
A CA file has been bootstrapped using certificates from the SystemRoots
keychain. To add additional certificates (e.g. the certificates added in
the System keychain), place .pem files in
/usr/local/etc/openssl/certs
and run
/usr/local/opt/openssl/bin/c_rehash
openssl is keg-only, which means it was not symlinked into /usr/local,
because Apple has deprecated use of OpenSSL in favor of its own TLS and crypto libraries.
If you need to have openssl first in your PATH run:
echo 'export PATH="/usr/local/opt/openssl/bin:$PATH"' >> ~/.bash_profile
For compilers to find openssl you may need to set:
export LDFLAGS="-L/usr/local/opt/openssl/lib"
export CPPFLAGS="-I/usr/local/opt/openssl/include"
==> Summary
🍺 /usr/local/Cellar/openssl/1.0.2q: 1,794 files, 12.1MB
==> Installing python dependency: readline
==> Downloading https://homebrew.bintray.com/bottles/readline-8.0.0.mojave.bottle.tar.gz
######################################################################## 100.0%
==> Pouring readline-8.0.0.mojave.bottle.tar.gz
==> Caveats
readline is keg-only, which means it was not symlinked into /usr/local,
because macOS provides the BSD libedit library, which shadows libreadline.
In order to prevent conflicts when programs look for libreadline we are
defaulting this GNU Readline installation to keg-only.
For compilers to find readline you may need to set:
export LDFLAGS="-L/usr/local/opt/readline/lib"
export CPPFLAGS="-I/usr/local/opt/readline/include"
==> Summary
🍺 /usr/local/Cellar/readline/8.0.0: 48 files, 1.5MB
==> Installing python dependency: sqlite
==> Downloading https://homebrew.bintray.com/bottles/sqlite-3.26.0_1.mojave.bottle.1.tar.gz
######################################################################## 100.0%
==> Pouring sqlite-3.26.0_1.mojave.bottle.1.tar.gz
==> Caveats
sqlite is keg-only, which means it was not symlinked into /usr/local,
because macOS provides an older sqlite3.
If you need to have sqlite first in your PATH run:
echo 'export PATH="/usr/local/opt/sqlite/bin:$PATH"' >> ~/.bash_profile
For compilers to find sqlite you may need to set:
export LDFLAGS="-L/usr/local/opt/sqlite/lib"
export CPPFLAGS="-I/usr/local/opt/sqlite/include"
==> Summary
🍺 /usr/local/Cellar/sqlite/3.26.0_1: 11 files, 3.7MB
==> Installing python dependency: xz
==> Downloading https://homebrew.bintray.com/bottles/xz-5.2.4.mojave.bottle.tar.gz
######################################################################## 100.0%
==> Pouring xz-5.2.4.mojave.bottle.tar.gz
🍺 /usr/local/Cellar/xz/5.2.4: 92 files, 1MB
==> Installing python
==> Downloading https://homebrew.bintray.com/bottles/python-3.7.2_1.mojave.bottle.1.tar.gz
######################################################################## 100.0%
==> Pouring python-3.7.2_1.mojave.bottle.1.tar.gz
==> /usr/local/Cellar/python/3.7.2_1/bin/python3 -s setup.py --no-user-cfg install --force --verbose --install-scripts=/usr/local/Cellar/python/3
==> /usr/local/Cellar/python/3.7.2_1/bin/python3 -s setup.py --no-user-cfg install --force --verbose --install-scripts=/usr/local/Cellar/python/3
==> /usr/local/Cellar/python/3.7.2_1/bin/python3 -s setup.py --no-user-cfg install --force --verbose --install-scripts=/usr/local/Cellar/python/3
==> Caveats
Python has been installed as
/usr/local/bin/python3
Unversioned symlinks `python`, `python-config`, `pip` etc. pointing to
`python3`, `python3-config`, `pip3` etc., respectively, have been installed into
/usr/local/opt/python/libexec/bin
If you need Homebrew's Python 2.7 run
You can install Python packages with
pip3 install <package>
They will install into the site-package directory
/usr/local/lib/python3.7/site-packages
See: https://docs.brew.sh/Homebrew-and-Python
==> Summary
🍺 /usr/local/Cellar/python/3.7.2_1: 3,833 files, 59.3MB
==> `brew cleanup` has not been run in 30 days, running now...
Pruned 0 symbolic links and 2 directories from /usr/local
==> Caveats
==> openssl
A CA file has been bootstrapped using certificates from the SystemRoots
keychain. To add additional certificates (e.g. the certificates added in
the System keychain), place .pem files in
/usr/local/etc/openssl/certs
and run
/usr/local/opt/openssl/bin/c_rehash
openssl is keg-only, which means it was not symlinked into /usr/local,
because Apple has deprecated use of OpenSSL in favor of its own TLS and crypto libraries.
If you need to have openssl first in your PATH run:
echo 'export PATH="/usr/local/opt/openssl/bin:$PATH"' >> ~/.bash_profile
For compilers to find openssl you may need to set:
export LDFLAGS="-L/usr/local/opt/openssl/lib"
export CPPFLAGS="-I/usr/local/opt/openssl/include"
==> readline
readline is keg-only, which means it was not symlinked into /usr/local,
because macOS provides the BSD libedit library, which shadows libreadline.
In order to prevent conflicts when programs look for libreadline we are
defaulting this GNU Readline installation to keg-only.
For compilers to find readline you may need to set:
export LDFLAGS="-L/usr/local/opt/readline/lib"
export CPPFLAGS="-I/usr/local/opt/readline/include"
==> sqlite
sqlite is keg-only, which means it was not symlinked into /usr/local,
because macOS provides an older sqlite3.
If you need to have sqlite first in your PATH run:
echo 'export PATH="/usr/local/opt/sqlite/bin:$PATH"' >> ~/.bash_profile
For compilers to find sqlite you may need to set:
export LDFLAGS="-L/usr/local/opt/sqlite/lib"
export CPPFLAGS="-I/usr/local/opt/sqlite/include"
==> python
Python has been installed as
/usr/local/bin/python3
Unversioned symlinks `python`, `python-config`, `pip` etc. pointing to
`python3`, `python3-config`, `pip3` etc., respectively, have been installed into
/usr/local/opt/python/libexec/bin
If you need Homebrew's Python 2.7 run
You can install Python packages with
pip3 install <package>
They will install into the site-package directory
/usr/local/lib/python3.7/site-packages
See: https://docs.brew.sh/Homebrew-and-Python
$
インストールが完了したので、「python3」コマンドでPython3が実行可能になっているかバージョンを確認してみましょう。
今回は「Python 3.7.2」と結果が返ってきたのでインストール完了です。
$ python3 -V
Python 3.7.2
今回は、Homebrewを使ったPython3のインストール方法でした。
「brew」を使える様にしておくと、他のソフトのインストールだけではなくアップデート、アンインストールもできるので、あると便利だと思います。
今回は、Homebrewのインストールもあったのでインストーラからインストールした方がいい様に思えますが、
Python3のインストールに使ったコマンドは、「brew install python3」だけで完了しているので、
インストーラーより楽になっています。
コマンドを使った Python3のインストール方法には「pyevn」を使う方法もありますが「brew」だけでもできるので、
今回は「brew」だけの方法を記事にしました。
Homebrewの準備ができていればソフトの管理が格段に楽になるので、
macOS 10.2以降であればHomebrewを導入しておいてもいいと思います。
他のコマンドとの組み合わせになりますがPythonライブラリのインストールにも使える様なので、
別の機会に記事にします。
今回はこれで終わりです。
 |
価格:3,996円 |
![]()
 |
Pythonスタートブック増補改訂版 いちばんやさしいパイソンの本/バージョン3に完全対 [ 辻真吾 ] 価格:2,700円 |
![]()
Python3をインストールし環境構築する。
Python3インストール方法【決定版】
pythonを始めようと思い忘備録として各OS毎のインストール方法を残しておきます。
インストールはとても簡単です。
初回はMacへのインストール方法を紹介します。
今回インストールしたMac環境
MacBook Pro (Retina, Mid 2012)
OSバージョン:macOS Mojava(10.14.3)
Macにはデフォルトで Pythonがインストールされているのバージョンを確認します。
バージョンの確認方法は、ターミナルから「python -V」コマンドを実行して確認します。
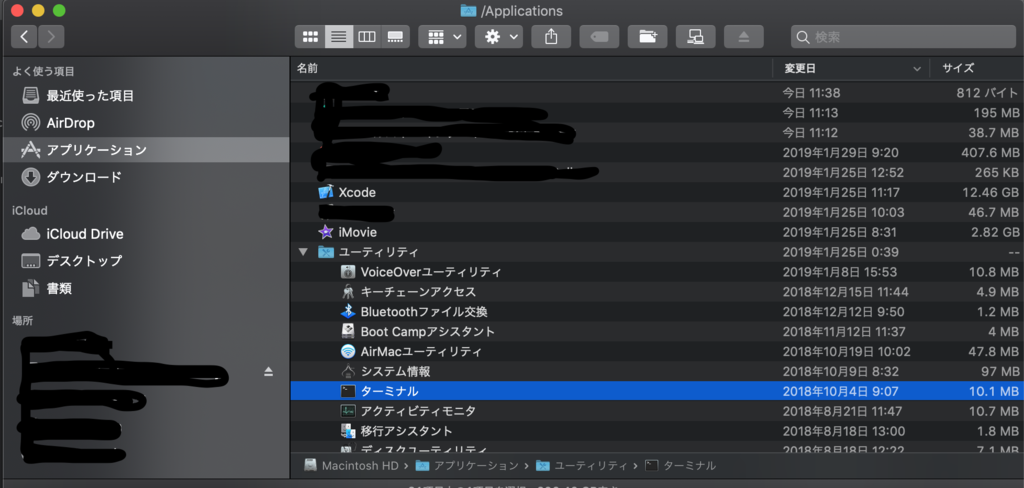
ターミナルの起動方法
Finderを開いて、アプリケーション>ユーティリティの中にターミナルがあるのでクリックして起動して下さい。
「python -V」コマンドの実行結果
最新では無いですが、2019年2月1日では、Python2.7.10がインストールされていました。
Python2系の環境を構築したい方はMacだとデフォルトで有るのでインストールは不要です。
最新版へのアップデート方法は後日まとめます。
この記事を見ている人はpythonに興味がある人なので大丈夫かと思いますが、
「python」とか、「python -v」小文字でコマンドを打ってしまうと、
pythonの実行モード(>>>)になり、Macコマンドが入力出来なくなります。
その時は「exit()」と入力して実行モードを終了してください。
簡単な動作確認する時は実行モードで確認すると楽なので覚えておいていいと思います。
$ python
Python 2.7.10 (default, Aug 17 2018, 19:45:58)
[GCC 4.2.1 Compatible Apple LLVM 10.0.0 (clang-1000.0.42)] on darwin
Type "help", "copyright", "credits" or "license" for more information.
>>>exit()
$
デフォルトのバージョンが確認できたので、Python3をインストールして行きましょう。
インストール手順
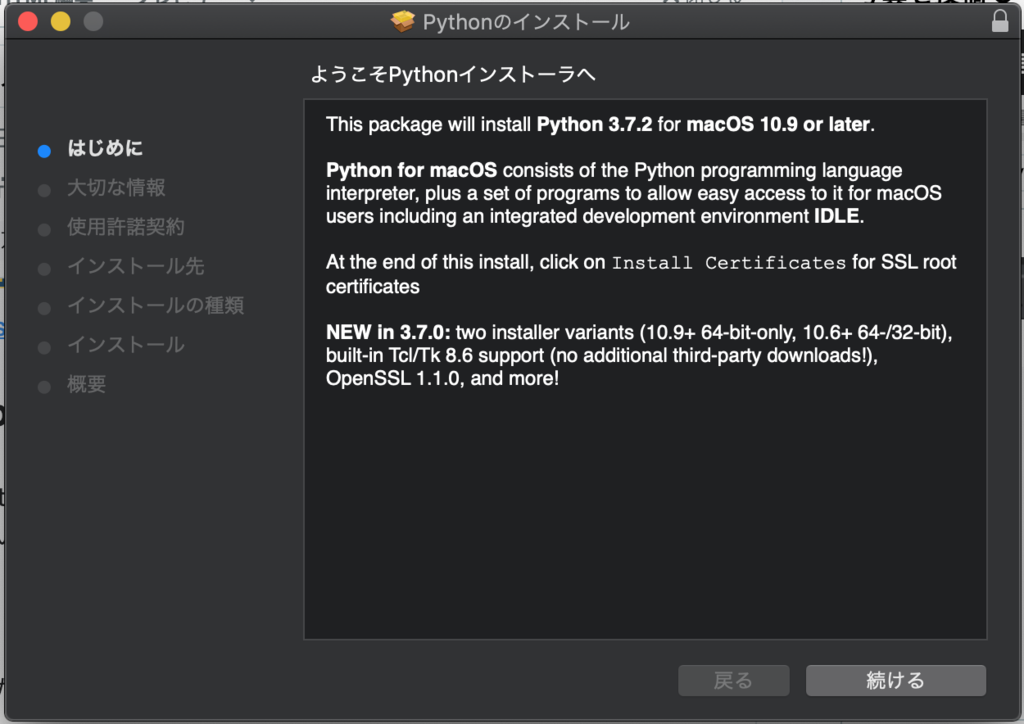
1.Python3のダウンロード
Pythonの公式ページからダウンロードします。
公式HP URL
https://www.python.org/downloads/
HPを開くと、「Download Python 3.7.2」ボタンがあるのでクリックして、
「python-3.7.2-macosx10.9.pkg」をダウンロードしましょう。
※2019年2月1日時点では「python-3.7.2」が最新版でしたが時期でダウンロード出来るバージョンも変わります。
このパッケージは、macOS 10.9(Mavericks)以降で動作する、64-bit-only版のPythonになります。

「Looking for Python with a different OS? Python for Windows, Linux/UNIX, Mac OS X, Other」の「Mac OS Ⅹ」リンク
Python Releases for Mac OS X | Python.orgからか、
Looking for a specific release?
の表にある各PythonバージョンのDownloadからもダウンロード出来るので探してみてください。
2.Pythonインストール
ダウンロードした「python-3.7.2-macosx10.9.pkg」をクリックします。
⇩ 「続ける」ボタンを押します。
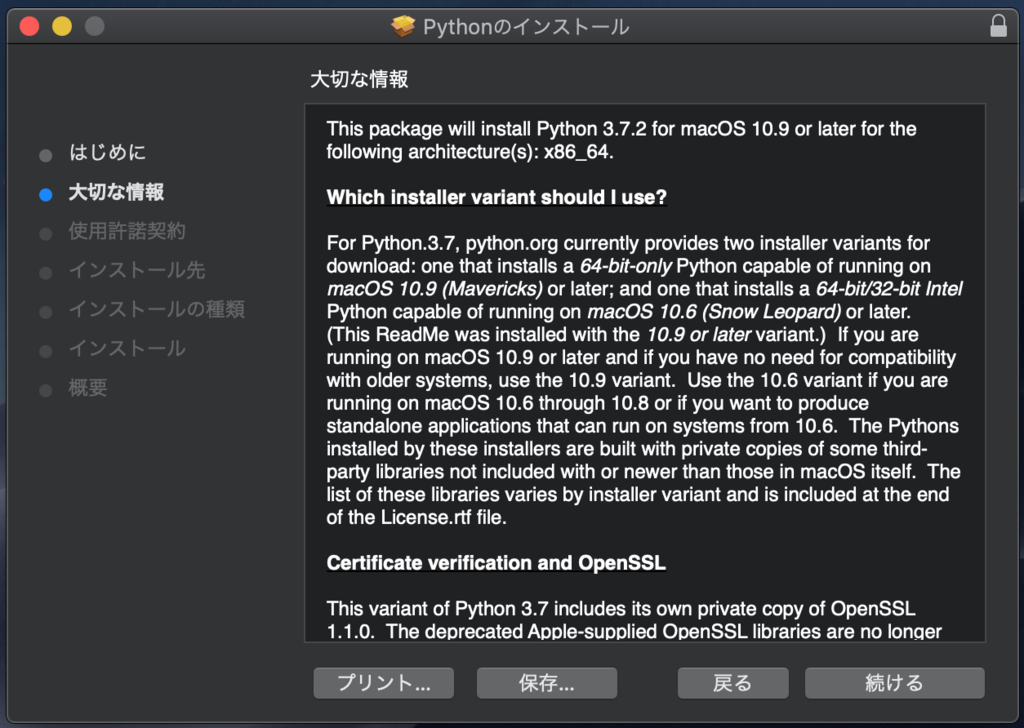
英語で規約とか書いてあるので内容を確認し、
⇩「続ける」ボタンを押します。
この画面も内容を確認して、
⇩「続ける」ボタンを押します。

確認した使用許諾契約の内容に同意した場合は、
⇩同意ボタンを押して同意します。

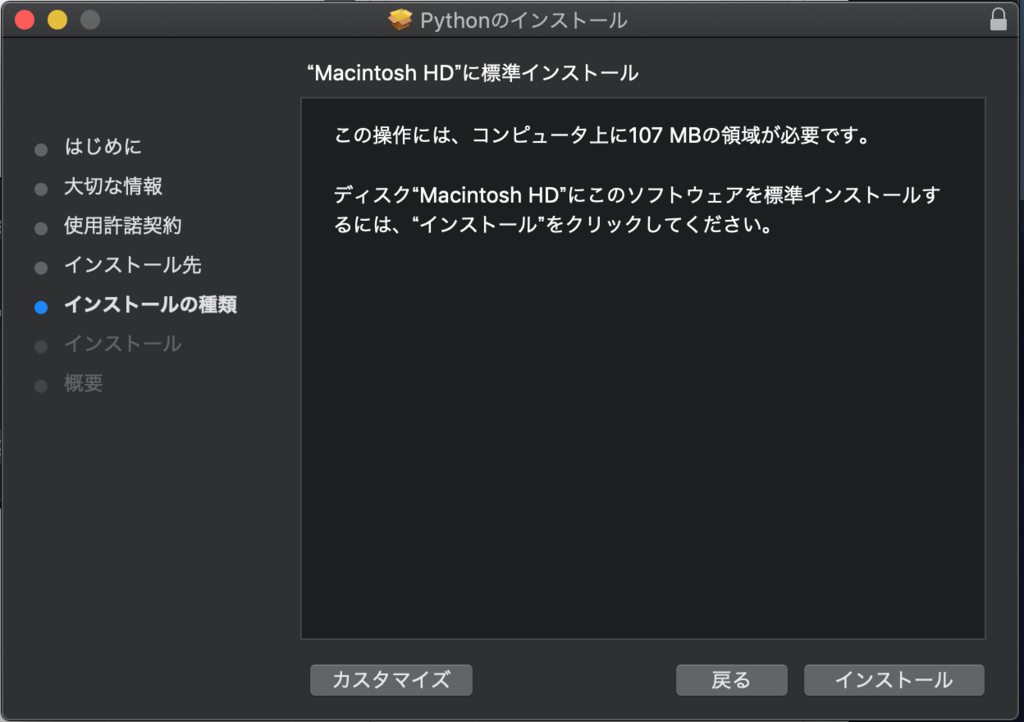
⇩インストールボタンを押します。
⇩ユーザーパスワードを聞かれるので、パスワードを入力してソフトウェアをインストールボタンを押して開始して下さい。

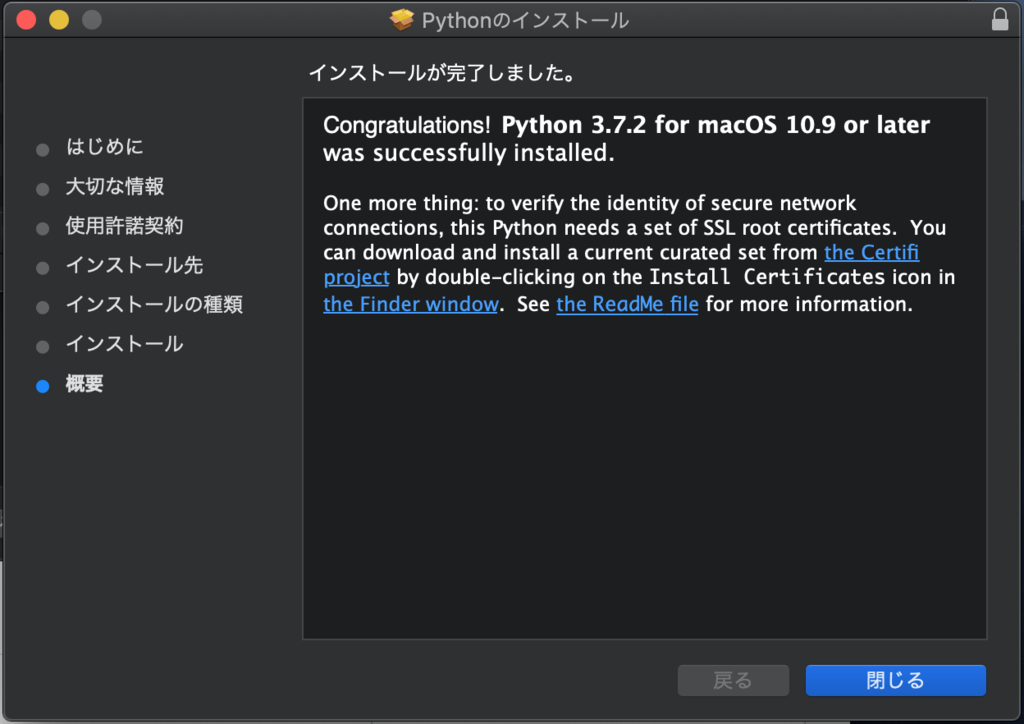
⇩完了するまで待ちます。

⇩閉じるボタンを押して完了です。
macOSのバージョンによってはインストーラーを「残すか?」「ゴミ箱に入れる?」か聞かれるので、どちらか選択して終了してください。
これでPython3がインストールされました。
インストールされたことを確認します。
インストール確認
ターミナルで「python3 -V」コマンドを打ってください。「Python3.7.2」と結果が返って来れば完了です。
$ python3 -V
Python 3.7.2
先ほど出てきた実行モードですが、
Python3を実行したい時は「python3」になるので注意してください。
なので、このMacには Pythonの2と3両方の十恋環境があることになります。
これで、 Pythonのインストールは完了しました。
プログラミングを円滑に行うためにIDEをインストールするとコーディングが楽になります。
IDEに関しては別の記事で書きます。
次回はWindows10へのインストール手順です。
installerからのインストール手順はさほど変わりませんが次回まとめます。